
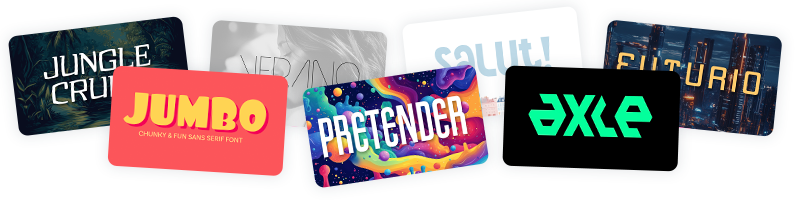
You’ve probably come across a few brands that seem to nail it with their graphic design every single time. Brands like Airbnb, Casper, and Dropbox are three examples that come to mind when it comes to good visual elements.
The simple truth is that good graphic design doesn’t just happen by chance. All successful graphic designers follow a tried-and-tested design process that helps them to achieve desired results. You can also learn and follow this process. Let’s start by demystifying this creative process to show you what works and why when it comes to graphic design.
What is the Graphic Design Workflow?
Graphic design uses visual elements like colors, logos, and typography to communicate brand messaging. It is a visual communication tool used by marketers to convey messages about a brand that resonates with the brand’s target audiences. Many graphic design professionals work as freelancers and hence should know how to build efficiency into their design process.
A graphic designer creates eye-catching visual elements that are on-brand for messaging and focused on the brand’s relevant audience. The graphic design workflow is the steps taken by the designer to bring creative design ideas that align with the client’s end goals.
Graphic designing is a combination in equal parts of creative and process-centric steps. A graphic designer will follow logical and step-by-step processes while using creative ideation to deliver the result. The graphic design workflow combines communication, critical thinking, creativity, and problem-solving.
You can break down the graphic design workflow into four distinct phases (definition, creation, feedback, and delivery). These phases can be further divided into six steps, as mentioned below. This approach can be applied to nearly every design project.
The Definition Phase can be broken down into three stages. These include reviewing the client’s creative brief, researching the client’s ecosphere and competition, brainstorming ideas, and creating the mood board.
Get 300+ Fonts for FREE
Enter your email to download our 100% free "Font Lover's Bundle". For commercial & personal use. No royalties. No fees. No attribution. 100% free to use anywhere.
The creation phase includes the actual sketching and refining of the initial design. The feedback stage covers presenting the creations to the client to seek their feedback before finalizing the designs and presenting them to the client.
Let us now look at these six steps followed by most graphic designers, including freelance designers.
1. Review the Outline
Read through the client’s design brief several times to get a handle on the client’s needs and expectations. Look at the total budget of the client and the deadline for the completion of the project. On-time and on-budget delivery of the visual elements is a critical attribute for a professional designer.
While analyzing the brief, scan the brief for keywords and deliverables that define the client’s needs. Factor in all these variables while figuring out the length of the design process. This is the foundation of your work plan.
The client’s keywords could relate to industry, market, form factor, tone, and style. Client access is important for the graphic designer. It gives the designer the ability to speak to the client and ask questions that help in clarifying the client’s expectations. Don’t hesitate in sending follow-up questions to your client if you have any doubts.
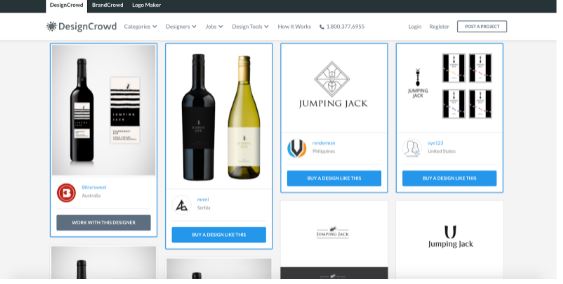
Let’s look at an actual design brief for a Wine label and logo design brief for an Australian vineyard:

Based on the brief and the designer’s interaction with the client, this was the initial submission:
When working on the next five design process steps, make sure you keep referring back to the brief as your reference point. This ensures that your design process stays aligned with the brief. Remember you’re the designer with the job to solve the brief.
2. Client Ecosystem Research
The goal of the research step is to understand the ecosystem your client operates in. This includes their competitors, the industry, and assessing the brand’s market positioning and differentiation strategies.
While the competitor’s designs may be a good source of inspiration, make sure you don’t copy them. Instead, analyze elements that work and how you can make improvements on those elements. Ultimately, you want to be different but stay within common tones and styles.
How You Did It in the Past
In the past, you probably did a simple Google search to research your client’s competitors. While that is still a viable option, there are other resources you can use to gather relevant and useful data.
How You Should Do It Now
Chances are that you already have a comprehensive list of competitors, especially if you have done your creative brief review and interacted with the client. In case you still need clarifications, you can use the following tools to gather competitive data on the brand you’re working for:
- Google them.
- Use tools like Buzzsumo or Ahrefs to get a comprehensive list of relevant competitors.
- Use Google Maps to identify where these competitors are located.
- Use tools like Alexa to find similar brands and build your competitor list.
- Use Trade directories like Yelp or Check a Trade.
- SimilarWeb is another website you can use for competitive analysis.
- Explore the visual content that the brand’s target audience consumes.
- If your client is selling software or an app, you can use pages like AlternativeTo.
Once you have compiled the final list of competitors, you need to analyze them. Here’s how you can do that:
- Check their website and blog, check the visual elements they use and how they use them.
- Look at the design work and details on their websites. For instance, look at their logo design, website theme, and color schemes.
- Check on their press mentions and interviews online.
- Check the social media channels like Facebook, YouTube, and LinkedIn, and see the elements they use on the social platforms.
- Sign up for their newsletter and download their eBooks
Researching the client’s ecosphere is an integral part of your design process. Using the right tools to conduct this research process is equally vital. Your results will help in inspiring original ideas while solidifying the overall design approach. If you’re working as part of a team, you can use scheduling software to ensure that you’re working coherently towards the same goals.
3. Create a Mood Board Based on Brainstorming
Creating a mood board is the creative starting point in graphic design. You can start by using a pen and paper to map out the purpose and critical elements of the design.
What are the emotions and thoughts that you want to trigger with your design elements? What is design messaging? While brainstorming means you’re creating multiple ideas, ensure that each idea is a good fit for the design brief.
You can also use a mood board template to create your first digital board. Each designer will have their preferred ways of sourcing and compiling their inspiration. If you like to have a visual representation of your inspiration at hand at all times, a mood board is a perfect tool to have on hand.
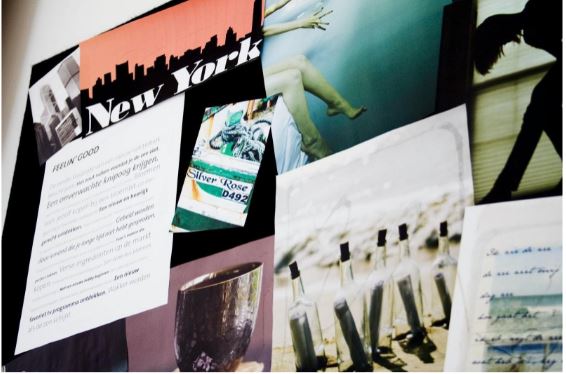
Some designers work with digital mood boards, while others prefer to create a physical board. The physical board is often a collection of clippings, print-outs, sketches, and color Pantone chips. Alternatively, create a simple digital board in Photoshop or InDesign.
Additionally, there are also several online tools for creating mood boards that allow you to share content with clients and collaborators. Pinterest is a golden oldie that is still a relevant source for images. It allows you to make secret boards that you can share with clients.
The images on Pinterest are also more trend-driven than Google Images, thereby allowing you to check out what the brands consumers are pinning and buying within your client’s niche. If you’re working as part of a team, a collaborative whiteboarding tool like MURAL lets you share your inspiration and ideas with other collaborators.
How You Did It in the Past
It was tough and laborious to generate and prioritize your creative ideas in the past. Creating concepts and then aligning them with visual elements like colors, textures, and fonts took effort and time. You also lacked access to fresh and trending ideas and perspectives.
How You Should Do It Now
Nowadays, you have access to multiple design platforms like Dribbble, Facebook groups like Advanced Graphic Design, and Slack communities like Designer’s Talk. In addition, you also have Q&A portals like Quora where you can share your mood boards and get instant feedback. This enables you to analyze and validate your designs, and ask questions about preferences.
4. Create a Rough Outline of Your Ideas
Once you have created your mood board, it’s time to build on your creative ideas. It’s time to start sketching. Most designers prefer to sketch using pen and paper before transferring the ideas to the digital domain.
How You Should Do It Now
Start the sketching process offline, which will help you focus on your work and stay away from online distractions. Using a large sketchpad and your favorite pens is a good starting point to ensure productivity and focus. To share your early sketches with the client, you can use an app like Adobe Scan or Tiny Scanner to digitize your offline designs.

Start building the framework for what the visual asset will look like based on the design brief and the information collected from your research process. Depending on what you’re working on, the elements under creation could include sketching out thumbnails, mockups, or graphic elements.
Larger and more significant projects, like logo development and web design, may require more fine-tuning and several iterations before presenting the concept to the client.
A point to note: If you’re working as part of a design team, it’s always a good idea to present and share your initial concepts with the rest of the team. The team is your first point of feedback. A good graphic design rule of thumb is to always pitch three ideas:
- The first pitch is usually precisely what the client asked for.
- The second pitch or idea could be your concept of the client brief and based on the research results.
- The third pitch could be a new concept or idea that could still meet the brief.
Having three ideas to pitch ensures that you haven’t spent all your time and effort creating something that gets rejected, thus forcing you to start from scratch again.
5. Seek Client Feedback and Make Changes
Once you’ve refined and finalized your trio of pitches, you’re ready to present them to the client. Some designers drag their feet at this stage and continue tweaking the concepts. In most cases, this is a waste of time. What if you spend an extra week tweaking things to your satisfaction, only to have the client reject them?
Connecting with the client at the earliest will save you both time and effort.
The client feedback stage involves a series of smaller steps that ensure quality control and perfect alignment with your stakeholders’ vision. Depending on what type of team you’re working with, this part of the graphic design workflow may look something like this:
- Submit your designs for internal review.
- Make the requested changes.
- Present the updated design to your client and the relevant decision-makers.
- While presenting, focus on how your design aligns with the design brief, the research results, and the initial client interactions.
- Gather both positive and negative feedback from relevant stakeholders.
- Confirm your next steps.
- Make the requested changes.
- Present this new version to the rest of the team.
From here on, rinse and repeat until all concerns have been addressed and the stakeholders are satisfied. There’s an art to presenting your ideas to clients, and if you find making design presentations nerve-wracking, your best approach is to simply be prepared.
Use a tool like Adobe InDesign for presenting your three design concepts as a well-composed document. Set the document on landscape A4 or Letter-sized pages, making it easy for a client to print in-house.
Another thing to remember is to be slightly thick-skinned to client comments and criticism. Many designers are sensitive to criticism of their designs. Realize that the client best knows their business. While they may not have your creative aesthetics, they often have a good sense of what has worked for them in the past.
6. Complete the Project
Once you have received the final approval from all stakeholders, you’re ready to deliver the visual elements in the required formats. For instance, if the client will print the element using the offset process, you need to submit your work as a PDF file with the CMY color schema.
Generally, the creative brief will specify the required format of the deliverable. Make sure you deliver the asset in the correct file types and sizes, so no changes are needed later on. Your final submission creates the overall impression in the client’s mind and makes them more likely to work with you again.
Bottomline
Graphic design and marketing are interlinked because generating marketing results requires a sound and robust communication strategy. Eye-catching visual assets are a brand’s communication tool.
As a graphic designer, your creative brief serves as both your instruction manual and your contract for a given project. It helps you keep your design efforts on point and aligned to the customer’s expectations at all times. Combining your design brief with client interaction minimizes the revision process and helps deliver on customer expectations.
Client presentation and listening to client feedback enable you to make the required changes and deliver your project on time. The six steps of the graphic design workflow mentioned in this article will help you become a better graphic designer over time.
Graphic design is a critical component of a brand’s marketing strategy, and following a consistent process is the first step in consistently delivering customer delight. Good luck with your graphic design career!
